******giveway over*****
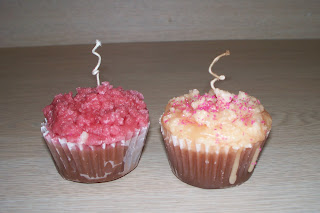
This picture really doesn't do this craft any justice. These cupcake candles are so adorable and make great gifts for teachers, co-workers, friends, favors for baby showers, and more. These cute grubby cupcake candles are actually pretty easy to make too!
I know I should have taken step by step pictures but I really didn't think of posting about it until afterwards. I also didn't really measure much - opps, sorry again but it just shows you how easy they are to make :)
Materials -
Wax - you can use paraffin, or soy for these. At least get a lb. (For the bottom I remelted excess wax from another craft - you can even use the ends of melted candles)
Scents - I ended up using 2 different scents - Spice for the bottom & Vanilla for the top
Color
Double Boiler, a pot with water & a metal carafe to melt in, or I just used an old pot and slowly melted the wax
Candy thermometer
Wicks - you can buy these at any craft store, I used a big roll & cut it long so I could twirl it when the wax had set.
Muffin tin
Muffin baking cups
Hand Mixer
To begin with, I stuck the baking cups in the muffin tin to act as a mold. They don't fit perfectly but don't worry, it'll work.
*************************************************
Next I melted some of the wax - Sorry I didn't measure - I started off with a little and added as I needed. I added colorant and scent. You can even use old crayons as a colorant if you are in a bind. Melt the wax never letting it get over 200 F. The wax you are melting is for the base of the candle. While you are melting you wax, you can get your wicks ready, dip them in the wax and stick them to the base of your baking cups. When you are ready, add the cooling wax to your baking cups and fill to the top. I usually have to use pencils to help prop up the wicks. I usually wait about an hour or more while the candles set. During that time I clean up. (You can put them in the fridge to let them set up faster.)
**************************************************
Now the bottom is nice and hard you can move on the the next step. This is a little bit harder, you may have to melt your wax again until you get faster but no worries, that's the beauty of this easy craft. No mistakes!
**************************************************
I add my wax, scent, and colorant letting it melt slowly. I make sure it's a different color than my bottom was. Usually something that would look yummy! As it cook it will get a skin to it, at that time I take my hand held mixer and mix making it "grubby". That's when I pick up my bottom & "Ice" my cupcake with a spoon. It's very easy! If the wax gets too hard too fast, just remelt it!.
You can add sprinkles to it too! When everything is all set I curl the wicks and sometimes even add a little bow. Dress them in Saran wrap and add to bow to the top for a quick and easy wrapping.
I should add - If you make these, take the wrapping off before burning!
****If you have any questions just email me @
time4mommy@gmail.com and I'll try to talk you through it.
****If you like this craft, please leave me a comment letting me know.
Do you want one but don't feel like making it? Win 2 of my cupcake candles by entering this giveaway!
How do you enter? So glad you asked!
Follow this blog and comment that you do.
For more Entries -
2. Tweet about this Giveaway and come back & comment you do
3. Blog about this Giveaway and come back & comment with a link so we can check it out.
This Giveaway will end Friday December 11, 2009 at midnight. Open to Canadian and U.S. Taking Time for Mommy Blog Followers. Good luck!
Giveaway is now Closed, Winner will be announced shortly.

 We have a Winner for our Partylite Antique Bronze refillable candle holder (pictured above) AND the Bestburn Iced Snowberries Candle refill! Using Random.org our winner is


